Gamota iOS SDK
Change SDK Log 6.1.x (Support iOS 14)
Require: Xcode 12 and later
- Step1: Add frameworks there to your project:
-FBSDKCoreKit.framework
-FBSDKLoginKit.framework
-FBSDKShareKit.framework
-AppsFlyerLib.framework
-GMOSDK.framework
-GMOBundle.bundle
- Step2: Create Bridging Header
- File -> New -> File
- Select Swift File

- This is essentially a dummy file which can be named anything.

- Confirm Create Bridging Header .

- This will create both the dummy Swift file and a bridging header sharing the name of your project. .

- Step3: Build Settings > Other Linker Flags
- Add –ObjC and -lstdc++

- Add –ObjC and -lstdc++
- Step4: Adding the AppTrackingTransparency permission in Info.plist
<key>NSUserTrackingUsageDescription</key>
      <string>This identifier will be used to deliver personalized ads to you.</string>
Download
Highlights
- Gamota Login – Support multiple login methods Gamota, Google, Facebook, Login in With Apple, Quick Play.
- Support Push Notification.
- Support In-app Purchase.
- Support tracking with
Firebase,Appslfyer
Overview
1. Integrate SDK
Download our iOS SDK in this link Download iOS SDK version 6.1.9. Please check the Sample to test and use the Frameworks for your project
1.1. Prerequisites
To get started with the Gamota Game SDK for iOS, you can set up the SDK and start building a new project or you can integrate the SDK in an existing project. You can also run the samples to get a sense of how the SDK works.
The Gamota Game SDK for iOS supports the following versions of software:
- Xcode 12 and later
- iOS 9 and later
1.2. Obtain app api key
Ask our Game Master support to retrieve all information for project configuration GMOAPIKey, FacebookAppID for Facebook config, GMOAFKey for Appsflyer config, GOOGLE_CLIENT_ID for Google login config
1.3. Configure your XCode Project
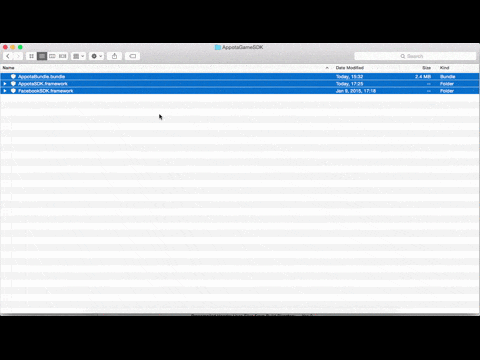
1.3.1. Add the Gamota iOS SDK
Open Frameworks folder and add all frameworks there to your project (GMOSDK.framework, GMOBundle.bundle, AppsFlyerLib.framework, FBSDKShareKit.framework, FBSDKCoreKit.framework, FBSDKLoginKit.framework, FirebaseAnalytics, FirebaseCore.framework , FirebaseNanoPB.framework,FirebaseCoreDiagnostics.framework, FirebaseInstanceID.framework, FirebaseMessaging.framework, GoogleToolboxForMac.framework , nanopb.framework,Protobuf.framework,GoogleSignIn.bundle,GoogleSignIn.framework,GoogleSignInDependencies.framework ).
(Remember to choose Create groups for any added folders and select Copy items into destination group's folder (if needed))
1.3.2. Add framework dependencies and setting
Select your project from the Project Navigator, and choose your application's target.
Open Build Phases tab, within Link Binary with Libraries, add the following frameworks:
-StoreKit.framework
-Accounts.framework
-Social.framework
-ImageIO.framework
-CoreTelephony.framework
-AdSupport.framework
-SystemConfiguration.framework
-Security.framework
-WebKit.framework
-SafariServices.framework
-iAd.framework
-LocalAuthentication.framework
-AuthenticationServices.framework
Open Build Settings, find Other Linker Flags, add
-ObjCthen check if Link Frameworks Automatically, Enable - Modules (C and Objectivce-C)) are set toYES
1.3.3. Configure the Info .plist
Open Info
plistsection addFacebookAppIDkey with value is your Facebook AppID.Open Info
plistsection addGOOGLE_CLIENT_IDkey with value is your Google Client IdOpen Info
plistsection addGMOAPIKeykey with value is your Gamota APIKey.-
Add url schemes:
- Identifier Facebook, URL Schemes:
fbYOUR_FACEOOK_APP_ID, Facebook AppID can be retreived from Facebook App Dashboard - Identifier Google, URL Schemes:
your bundle idfor example (com.gmt.games) - Identifier Google Sign-in, URL Schemes:
your reversed client ID as a URL schemefor example (com.googleusercontent.apps.1234567890-abcdefg)
- Identifier Facebook, URL Schemes:
-
Add tracking infor key to plist for
Appsflyerwith keys (ask ourGMfor keys):- GMOAFKey
- GMOAFAppID
The finished .plist should look like this or check the Sample for plist configuration

1.3.4a. Configure for iOS14
- Step1: Create Bridging Header
- File -> New -> File
- Select Swift File
- This is essentially a dummy file which can be named anything.
- Confirm Create Bridging Header .
- This will create both the dummy Swift file and a bridging header sharing the name of your project. .
- Step2: Build Settings > Other Linker Flags
- Add –ObjC and -lstdc++
- Add –ObjC and -lstdc++
- Step3: Adding the AppTrackingTransparency permission in Info.plist
<key>NSUserTrackingUsageDescription</key>
        <string>This identifier will be used to deliver personalized ads to you.</string>
1.3.4b. Configure for iOS9
Check our sample for correct plist configuration for iOS9
- Whitelist SDK servers for Network Requests in
plist
You will be affected by App Transport Security. Accept all API
<key>NSAppTransportSecurity</key>
<dict>
  <key>NSAllowsArbitraryLoads</key>
      <true/>
</dict>
- Bitcode and App Thinning
Set ENABLE_BITCODE=NO compiler flag in XCode setting
- Whitelist URL schemes
Add LSApplicationQueriesSchemes to Info.plist
<key>LSApplicationQueriesSchemes</key>
<array>
  <string>fbauth2</string>
  <string>fbauth</string>
  <string>fbapi</string>
  <string>fb-messenger-api</string>
  <string>fbshareextension</string>
  <string>tel</string>
  <string>fb-messenger-public</string>
  <string>fb-messenger</string>
  <string>fb</string>
</array>
The plist changes should look like this

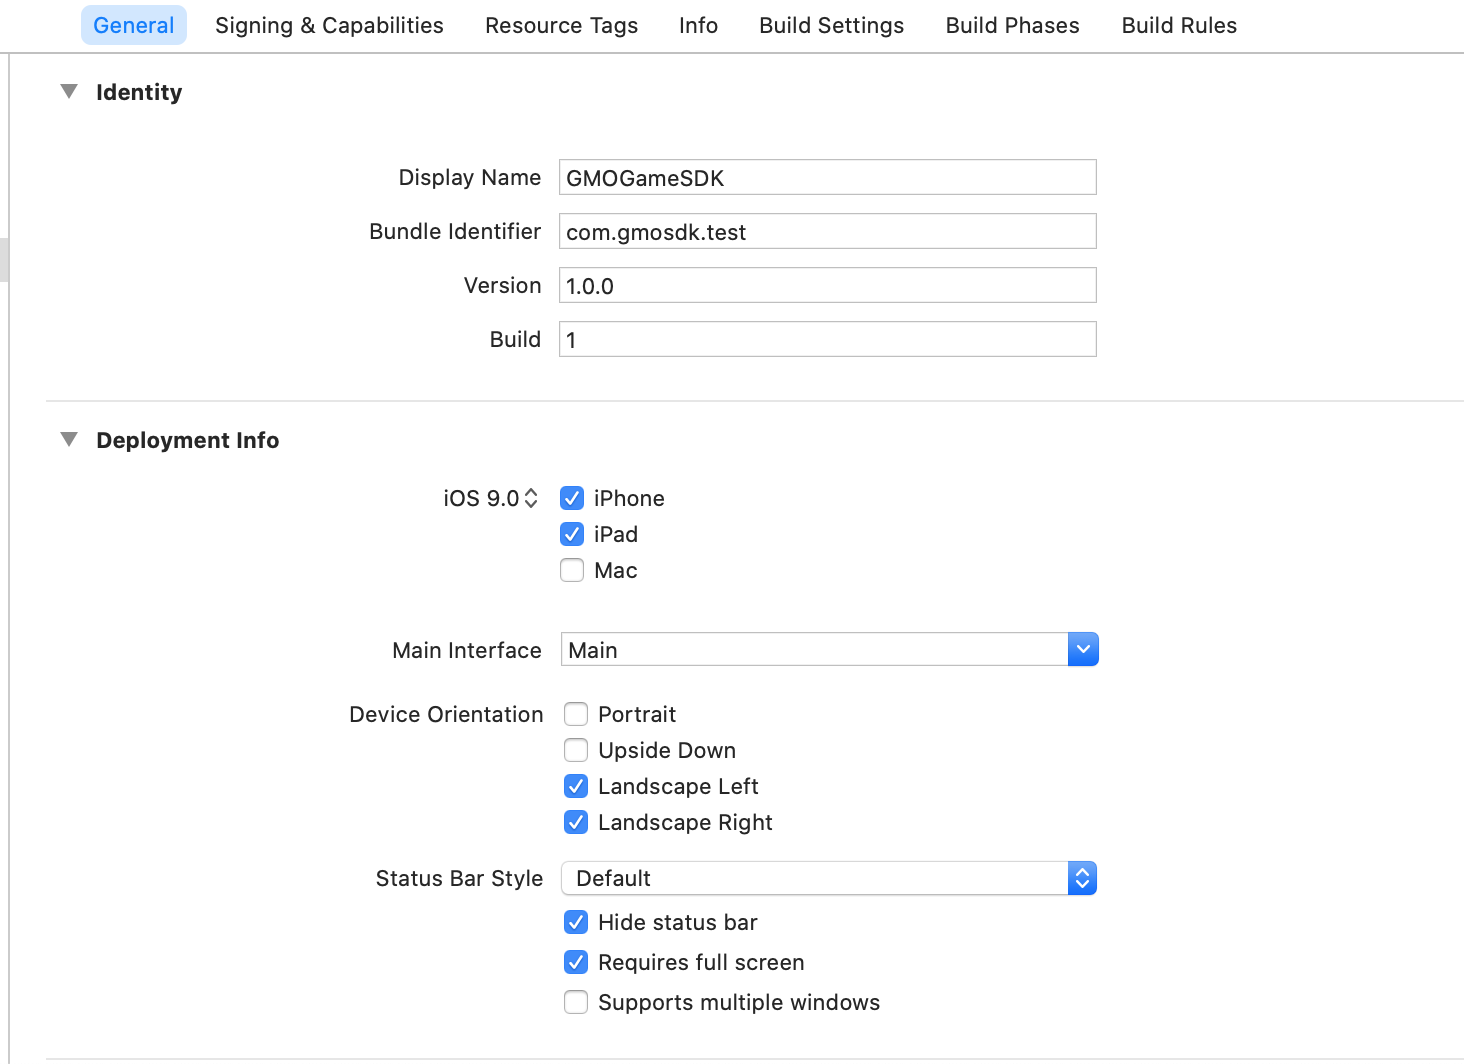
1.3.5. Configure Device Orientation
Select your project from the Project Navigator, and choose your application's target.
Open General tab, find Deployment Info.
Make Sure Device Orientation are Landscape Left and Landscape Right .
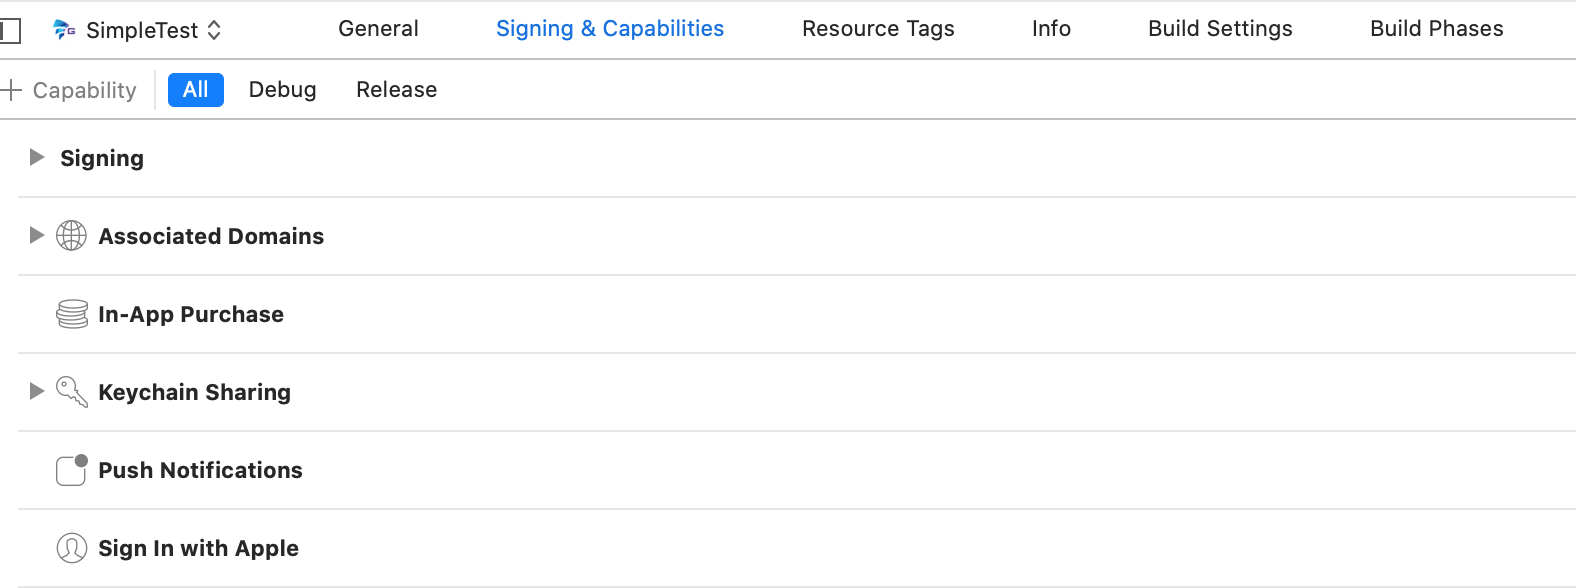
1.3.6. Configure Signing & Capabilities
Enable Push Notification, In-App Purchase, Keychain Sharing,Associated Domain , Sign In with Apple in your project setting.
1.3.7. Add a Firebase configuration file
Step 1.Click GoogleService-Info.plist to obtain your Firebase iOS config file.
Step 2.Move your config file (GoogleService-Info.plist) into the root of your Xcode project. If prompted, select to add the config file to all targets.
2. Client APIs
2.1 Init, configure and add Tracking SDK
Gamota SDK init must be called once when application start via GMOGameSDK class call [GMOGameSDK configure] so most of the time it will be placed in AppDelegate's method application:didFinishLaunchingWithOptions:
- In AppDelegate.h add import and use AppDelegate as protocol:
// Add import for GMO SDK and tracking
#import <GMOSDK/GMOSDK.h>

// Add callback
@interface AppDelegate () <GMOGameSDKCallback>

@end
- In
AppDelegate.mcall configure
- (BOOL)application:(UIApplication *)application didFinishLaunchingWithOptions:(NSDictionary *)launchOptions
{
    // Your code is placed above
    [GMOGameSDK configure];
    [GMOGameSDK sharedInstance].delegate = self;
}
- Add handle open URL in function
application:openURL:sourceApplication:annotation:
- (BOOL) application:(UIApplication *)application openURL:(NSURL *)url sourceApplication:(NSString *)sourceApplication annotation:(id)annotation {
    return [GMOGameSDK  application:application handleOpenURL:url sourceApplication:sourceApplication annotation:annotation];
}
- If you use
application:openURL:options:please use (You can not use bothapplication:openURL:sourceApplication:annotation:orapplication:openURL:options:)
- (BOOL) application:(UIApplication *)app openURL:(NSURL *)url options:(NSDictionary<UIApplicationOpenURLOptionsKey,id> *)options {
    return [GMOGameSDK application:app openURL:url options:options];
}
- We support payment by the floating SDK button. To prevent user to make payment before entering the game (actually choose server and game user) by using the floating SDK button. You should call
setSDKButtonVisibility:TRUEwhen configure the SDK and then callsetSDKButtonVisibility:TRUEwhen game user is ready.
[[GMOGameSDK sharedInstance] setSDKButtonVisibility:TRUE];
-
There are 4 functions to control SDK follow:
setKeepLoginSession:(BOOL)this function will control the Gamota Login Session will be kept or deleted at app lauching (when deleted user has to login again when app start). You should callsetKeepLoginSession:TRUE.
Note : If this function is not called, login session will be kept by default.setAutoShowLoginDialog:(BOOL)this function will control the Gamota Login View will be automatically show at app lauching (when user's not logged in) or you have to call showLoginView function to show the LoginView.
Note : If this function is not called, login view will automatically show at app lauching (when user's not logged in).-
setSDKButtonVisibility:(BOOL)call this function to setting hide or show SDK floating button.
Note : If this function is not called, the SDK floating button will automatically show at app lauching. -
setHideWelcomeView:(BOOL)call this function to setting hide or show Wellcome View.
Note : If this function is not called, the Wellcome View will automatically show at app lauching.
2.2. Deeplink Open app from mobile web
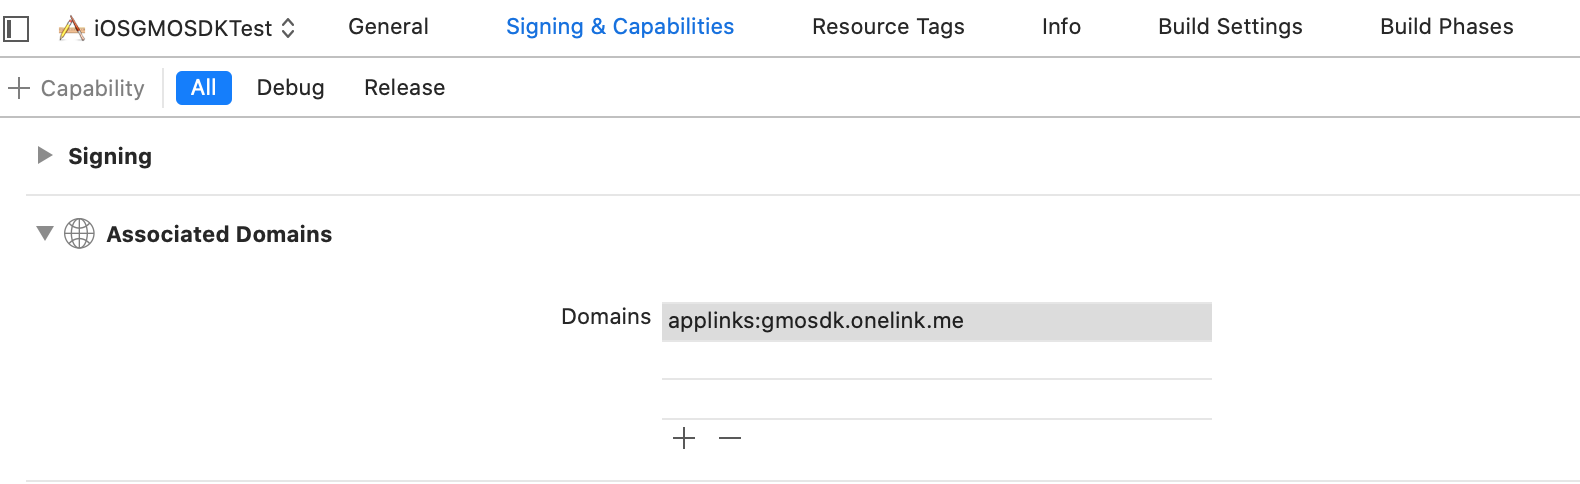
In Xcode Setting , open Signing & Capabilities and turn on
Associated DomainOur contact point will give you the OneLink
Add the subdomain to the setting (example:
applinks:gmosdk.onelink.me)
Note: Please update your newest provision profile we sent you.
2.3. User functions
Once you've implemented init SDK function, start using login features.
2.3.1. Show login view
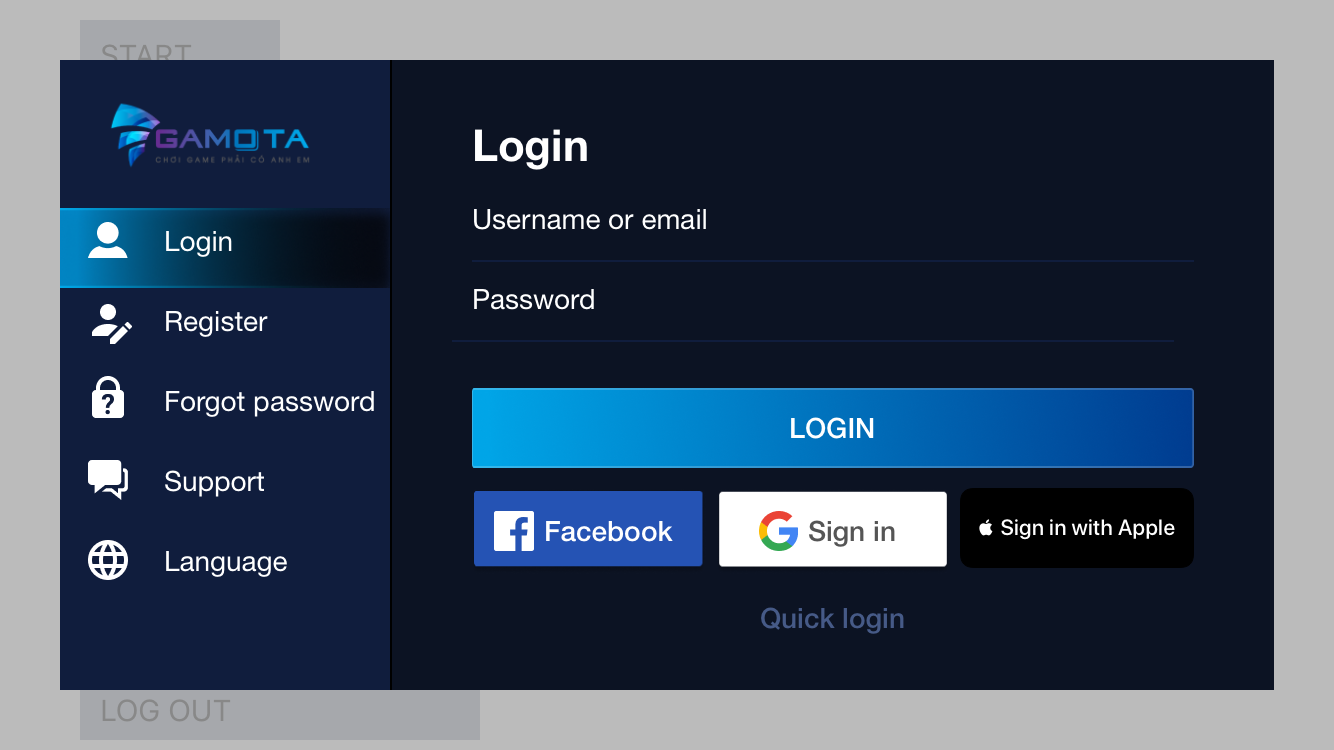
As mentioned above login dialog flow can be control by function setAutoShowLoginDialog:. Automatically show login view at app launching or manual call showLoginView when you need:
- Show Login View
[GMOGameSDK showLoginView];
Gamota Login Dialog contains 5 authorization methods: Facebook, Google, Gamota User, Quick Login and Login With Apple (only support iOS 13 and higher)
- Show Login View with iOS 12 and lower
- Show Login View with iOS 13 and higher

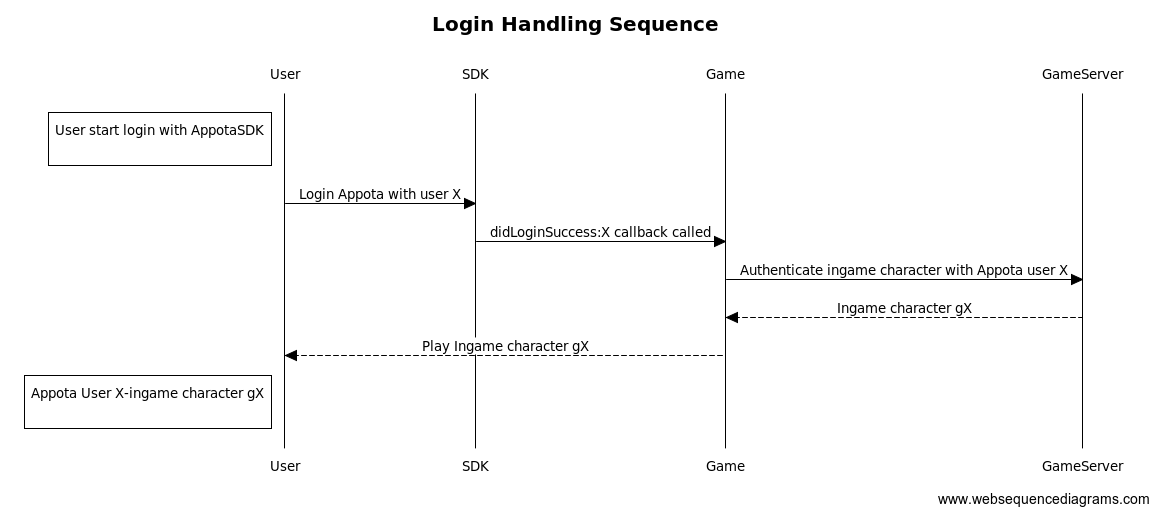
Follow this mechanism for login function, please implement didLoginSuccess callback to authenticate your in-game user.
2.3.3. Switch Account
- Switch account function
Call it when you want to switch account.
[GMOGameSDK switchAccount];
2.3.4. Logout
- Logout function
[GMOGameSDK logOut];
Call it when you want to log out.
2.3.5. Check user login
-
Check user login
-
This function will return user logged in state
[GMOGameSDK isUserLoggedIn];
2.3.6. Get Logged in user info
- Get Logged in user info Return GMOUserLoginResult (
nilif user not logged in)
[GMOGameSDK getUserInfo];
2.3.7. Handle authenticaiton callbacks
GMOSDK provide 4 callbacks delegate for login defined in GMOGameSDKCallback, please implement these functions to Appdelegate.m
Note 2 callbacks are @required : -didLoginSuccess: and -didLogOut:
Retreive Gamota user info (userID and access token) from GMOUserLoginResult then post to your server to verify and create game user. For more detail about user integration on server: User Integration
Note Remember verify Gamota UserID, UserName and Access token on your server before proceeding game user integration
- (void) didLoginSuccess:(GMOUserLoginResult*) userLoginResult
| Parameter | Description |
|---|---|
| userLoginResult | userLoginResult is GMOUserLoginResult object of user information (username, user_id, access token, verifyToken) |
Login fail callback
Callback when login have problems
- (void) didLoginErrorWithMessage:(NSString *)message withError:(NSError *)error;
| Parameter | Description |
|---|---|
| message | message is message error |
| error | error is error of login prblem |
Logout callback
- Callback after user logout with user name rem
- Handle logout user and log them out of the games
- (void) didLogout:(NSString*) userName
| Parameter | Description |
|---|---|
| userName | userName is user name logout |
Close login view callback
Callback when user close login view at app launching
- (void) didCloseLoginView;
| Parameter | Description |
|---|---|
| userLoginResult | userLoginResult is GMOUserLoginResult object of user information (username, user_id, access token) |
| Parameter | Description |
|---|---|
| userLoginResult | userLoginResult is GMOUserLoginResult object of user information (username, user_id, access token) |
2.4. Game function
This function is called when user choose role name (roleID) and server name (serverID). The information will be used to make payment to correct roleID and serverID. If you do not set this user will have to choose serverID and serverName.
[GMOGameSDK setRoleName:@"your_game_role_name" roleID:@"your_game_role_id" serverName:@"your_server_name" serverID:@"your_server_id"];
Please remember changing roleID and serverID each time user change roleID and serverID
2.5. Payment function
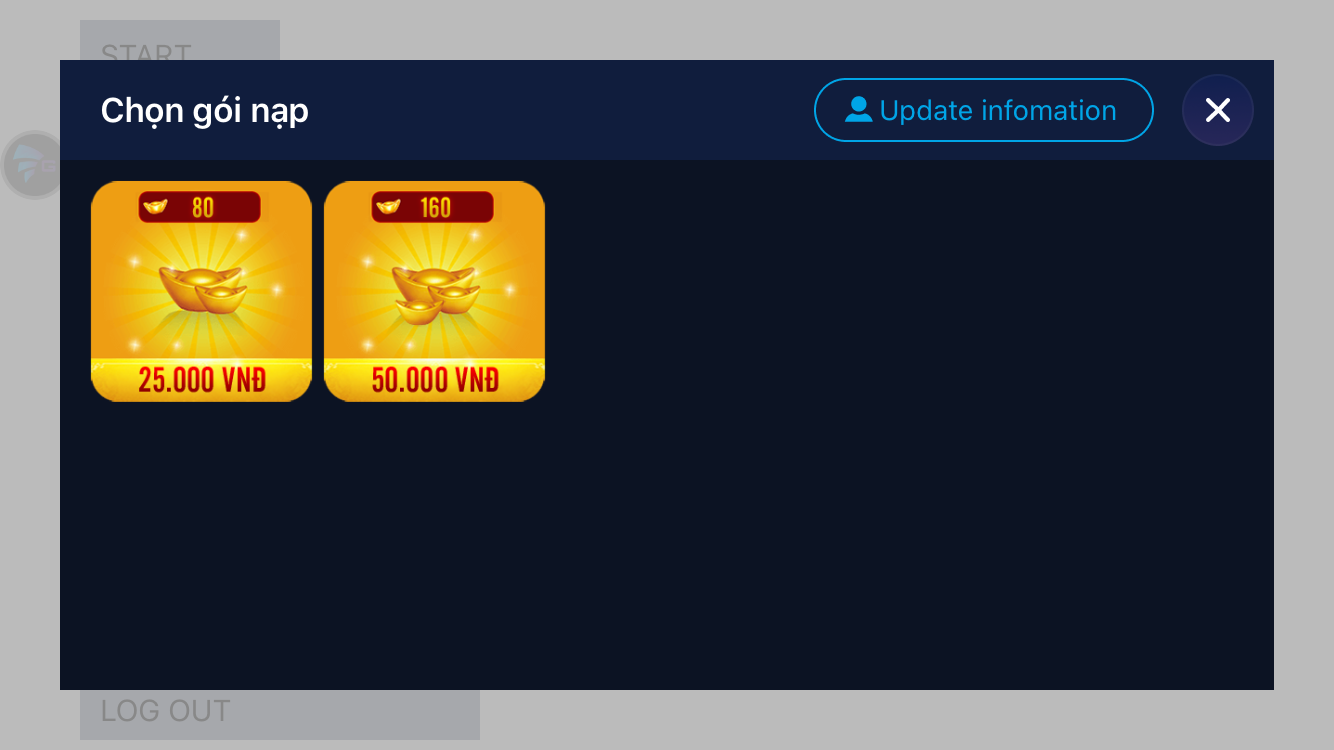
2.5.1. Show payment view
This function will show all Apple payment available package for users. Please connect with our GameMaster to ask about payment configuration
Show default list payment view
[GMOGameSDK showPaymentView]
Show a packageID for Apple Payment
[GMOGameSDK showPaymentViewWithPackageID:(NSString*)];
2.5.2. Show payment view from SDK floating button
2.5.3. Close payment View
You can close payment view by use this function:
[GMOGameSDK closePaymentView];
2.5.4. Get payment state
You can get payment state by use this function:
- (NSString*) getPaymentStateWithPackageID:(NSString*) packageID;
2.5.5. Payment Callback
Callback when payment success
- (void) didPaymentSuccessWithResult:(GMOPaymentResult*) paymentResult withPackage:(NSString *) packageID;
2.6. Push notification function
Register push notification
Register push notification (currenly only support iOS).
[GMOGameSDK registerPushNotification];
Configure push notification with data
+ (NSString*) configurePushNotificationWithTokenData:(NSData*) deviceTokenData;
Configure push notification with data call after you register push notification. You push this function in your application delegate :
- (void)application:(UIApplication*)application didRegisterForRemoteNotificationsWithDeviceToken:(NSData*)deviceToken
{
    [GMOGameSDK configurePushNotificationWithTokenData:deviceToken];
}
Handle push notification
+ (void) handlePushNotification:(NSDictionary *)receiveDictionary;
You push this function in your application delegate :
- (void)application:(UIApplication *)application didReceiveRemoteNotification:(NSDictionary *)userInfo{
    [GMOGameSDK handlePushNotification:userInfo];
}
2.7. Tracking Event function
- Track user level function when user complete a level.
[GMOGameSDK trackLevel:(int) level];
[GMOGameSDK trackUpdateData:(BOOL) isDowload];
[GMOGameSDK trackLoginGame];
[GMOGameSDK trackReactMisson:(NSString *) missionName];
[GMOGameSDK trackJoinClan:(NSString *) clanName];
[GMOGameSDK trackBattleClan:(NSString *)clanName];
[GMOGameSDK trackFirstRecharge];
[GMOGameSDK trackOpenShopButNoRecharge];
[GMOGameSDK trackOpenShopAndRecharge];
[GMOGameSDK trackOpenWelfare];
[GMOGameSDK trackOpenActivity];
[GMOGameSDK trackHuntBoss];
[GMOGameSDK trackBeginnerComplete];
[GMOGameSDK trackJoinClan:(NSString *) clanName];
2.8. Open Module
- Open User Info View
[GMOGameSDK showUserInfoView];
[GMOGameSDK showNewsView];
[GMOGameSDK showEventView];
[GMOGameSDK showGCView];
[GMOGameSDK showRatingView];
[GMOGameSDK openGroup];
[GMOGameSDK openFanpage];
[GMOGameSDK shareLinkFacebook:(NSString *)url];
- (void) didRatingSuccess;
- (void) didOpenGroup;
- (void) didOpenFanpage;
3. FAQ and Glossary
- We support payment by the floating SDK button. To prevent user to make payment before entering the game (actually choose server and game user) by using the floating SDK button. You should call
setSDKButtonVisibility:FALSEwhen configure the SDK and then callsetSDKButtonVisibility:TRUEwhen game user is ready.